I've been trying to export my Blogger posts to Wordpress for some time now. The reason was to assure myself that if in the future I wanted to migrate away from Blogger for whatever reason, there was an easy way to transfer all of the content to an alternative system. In order to do this, I was trying to get the Blogger Importer plugin to work for ages, but it constantly errored out, giving a message about Google denying the request due to it being malformed.
I had almost given up on finding a way to import the content, when a google search led me to the "Importing Content" section of the Wordpress Codex. This was useful as it lead me to this page:
http://blogger2wordpress.appspot.com/
which usefully converts your blogger export file into the Wordpress format and gives it to you as a downloadable file. After downloading, I just went to the "Tools", "Import" section of the Wordpress admin console, selected the "Wordpress" link, installed the plugin, selected the file and viola! The posts were imported along with the images which had been saved as attachments. The only missing feature that I've found is that the import didn't import the labels that accompanied each post.
Thursday, 26 January 2012

Wednesday, 25 January 2012
Writeable Rsync server with authentication
In my previous post we talked about how to setup a simple read-only rsync server. In this post, we'll be taking that simple read-only example and expanding it to allow multiple users, each with their own credentials.
In order to do this, we need to modify the /etc/rsyncd.conf file, and change the following lines:
Note that "bozo" is the username of a fake user we're going to create. We can see in this configuration that we're pointing to a file under /etc/rsyncd.secrets. We're going to have to create this file and populate it with the credentials for any users we have created. In this case, we populate it with bozo's username and password:
We also have to set the permissions on this file to make sure that it's only readable by the root user, using the chmod command:
Now, usually we would run the "reload" command to send a message to the server to reload its configuration, but when we do this for rsync, we get the following message:
Which is very useful indeed. Now when we connect from the client side, we have to do so using the credentials which we've just created. The command looks like:
This will ask us for a password, which we know is "clown" from before after which the copy should start as usual. If you want to test out the write capability of the server, we just need to create a file in our current directory and then execute the rsync command going the other way:
In the future we might want to automate the rsync process in order to have it run as a cron job or other automated job. This means that we won't have a human there to enter the password. This can be gotten around with by using the "--password-file" option of the rsync command, like so:
Note that as with the rsyncd.secrets file mentioned previously, you'll have to change the permissions on this file to ensure that it's not world readable. The file itself just needs to contain the password to use and nothing else.
In order to do this, we need to modify the /etc/rsyncd.conf file, and change the following lines:
read only = no

auth users = bozo

secrets file = /etc/rsyncd.secrets
Note that "bozo" is the username of a fake user we're going to create. We can see in this configuration that we're pointing to a file under /etc/rsyncd.secrets. We're going to have to create this file and populate it with the credentials for any users we have created. In this case, we populate it with bozo's username and password:
bozo:clownWe also have to set the permissions on this file to make sure that it's only readable by the root user, using the chmod command:
chmod 600 /etc/rsyncd.secretsNow, usually we would run the "reload" command to send a message to the server to reload its configuration, but when we do this for rsync, we get the following message:
$ service rsync reload

 * Reloading rsync daemon: not needed, as the daemon

 * re-reads the config file whenever a client connects.
Which is very useful indeed. Now when we connect from the client side, we have to do so using the credentials which we've just created. The command looks like:
rsync -r bozo@192.168.1.10::public/ .
This will ask us for a password, which we know is "clown" from before after which the copy should start as usual. If you want to test out the write capability of the server, we just need to create a file in our current directory and then execute the rsync command going the other way:
rsync -r . bozo@192.168.1.10::public/
In the future we might want to automate the rsync process in order to have it run as a cron job or other automated job. This means that we won't have a human there to enter the password. This can be gotten around with by using the "--password-file" option of the rsync command, like so:
rsync --password-file=~/.rsync_pass -r . bozo@192.168.1.10::public/
Note that as with the rsyncd.secrets file mentioned previously, you'll have to change the permissions on this file to ensure that it's not world readable. The file itself just needs to contain the password to use and nothing else.
Thursday, 19 January 2012
Simple read-only rsync server on Ubuntu
If you haven't heard of it rsync is a piece of software which allows you to keep files in sync over a network, while only copying across the "changes" from one copy to the next. The advantages of this are that a lot less data needs to be transferred than would have to be done with something like FTP or SFTP. This attribute of rsync also makes it perfect for things like backups which don't change much from one iteration to the next.
Installing rsync is as simple as:
Although, I've found that with the server version of Ubuntu, it's already installed after installing the OS.
By default, the server doesn't come configured or enabled to start at boot. In order to configure it, we will need to copy across the example rsync configuration into the /etc directory and modify the /etc/default/rsync file:
Modify the /etc/default/rsync file to look like the following:
The only variable that's really changed from the default is the "RSYNC_ENABLED" which has been set to "true".
If we have a look at the config file under /etc/rsyncd.conf, we can see that we're allowing read-only access to the /var/www/pub directory to any user:
Now all we need to do is to create the folder and start up the rsync server:
In order to test the server, you can just drop any files into the /var/www/pub directory and then download them using:
e.g. rsync -r 192.168.1.10::public/ .
This will copy across all of the files from /var/www/public into your current directory. Note that if you leave out the dot at the end, it will merely display the list of files under /var/www/pub. Another thing to note is that by default the Rsync server uses TCP port 873 to communicate with the rsync client, so you may have to open up this port on your firewall if it is blocked.
Installing rsync is as simple as:
sudo apt-get install rsyncAlthough, I've found that with the server version of Ubuntu, it's already installed after installing the OS.
By default, the server doesn't come configured or enabled to start at boot. In order to configure it, we will need to copy across the example rsync configuration into the /etc directory and modify the /etc/default/rsync file:
sudo cp /usr/share/doc/rsync/example/rsyncd.conf /etc/Modify the /etc/default/rsync file to look like the following:
# defaults file for rsync daemon mode


# start rsync in daemon mode from init.d script?

#  only allowed values are "true", "false", and "inetd"

#  Use "inetd" if you want to start the rsyncd from inetd,

#  all this does is prevent the init.d script from printing a message

#  about not starting rsyncd (you still need to modify inetd's config yourself).

RSYNC_ENABLE=true


# which file should be used as the configuration file for rsync.

# This file is used instead of the default /etc/rsyncd.conf

# Warning: This option has no effect if the daemon is accessed

#          using a remote shell. When using a different file for

#          rsync you might want to symlink /etc/rsyncd.conf to

#          that file.

# RSYNC_CONFIG_FILE=


# what extra options to give rsync --daemon?

#  that excludes the --daemon; that's always done in the init.d script

#  Possibilities are:

#   --address=123.45.67.89  (bind to a specific IP address)

#   --port=8730    (bind to specified port; default 873)

RSYNC_OPTS=''


# run rsyncd at a nice level?

#  the rsync daemon can impact performance due to much I/O and CPU usage,

#  so you may want to run it at a nicer priority than the default priority.

#  Allowed values are 0 - 19 inclusive; 10 is a reasonable value.

RSYNC_NICE=''


# run rsyncd with ionice?

#  "ionice" does for IO load what "nice" does for CPU load.

#  As rsync is often used for backups which aren't all that time-critical,

#  reducing the rsync IO priority will benefit the rest of the system.

#  See the manpage for ionice for allowed options.

#  -c3 is recommended, this will run rsync IO at "idle" priority. Uncomment

#  the next line to activate this.

# RSYNC_IONICE='-c3'


# Don't forget to create an appropriate config file,

# else the daemon will not start.
The only variable that's really changed from the default is the "RSYNC_ENABLED" which has been set to "true".
If we have a look at the config file under /etc/rsyncd.conf, we can see that we're allowing read-only access to the /var/www/pub directory to any user:
# sample rsyncd.conf configuration file


# GLOBAL OPTIONS


#motd file=/etc/motd

#log file=/var/log/rsyncd

# for pid file, do not use /var/run/rsync.pid if

# you are going to run rsync out of the init.d script.

# pid file=/var/run/rsyncd.pid

#syslog facility=daemon

#socket options=


# MODULE OPTIONS


[public]


 comment = public access

 path = /var/www/pub

 use chroot = yes

# max connections=10

 lock file = /var/lock/rsyncd

# the default for read only is yes...

 read only = yes

 list = yes

 uid = nobody

 gid = nogroup

# exclude =

# exclude from =

# include =

# include from =

# auth users =

# secrets file = /etc/rsyncd.secrets

 strict modes = yes

# hosts allow =

# hosts deny =

 ignore errors = no

 ignore nonreadable = yes

 transfer logging = no

# log format = %t: host %h (%a) %o %f (%l bytes). Total %b bytes.

 timeout = 600

 refuse options = checksum dry-run

 dont compress = *.gz *.tgz *.zip *.z *.rpm *.deb *.iso *.bz2 *.tbz
Now all we need to do is to create the folder and start up the rsync server:
sudo mkdir -p /var/www/pub

sudo service rsync start
In order to test the server, you can just drop any files into the /var/www/pub directory and then download them using:
rsync -r [hostname/IP address]::public/ .e.g. rsync -r 192.168.1.10::public/ .
This will copy across all of the files from /var/www/public into your current directory. Note that if you leave out the dot at the end, it will merely display the list of files under /var/www/pub. Another thing to note is that by default the Rsync server uses TCP port 873 to communicate with the rsync client, so you may have to open up this port on your firewall if it is blocked.
Monday, 9 January 2012
pwgen - Generate random passwords on Linux
There's a useful package in Debian/Ubuntu called pwgen, which allows you to generate random, human pronouncable (this is moot) passwords.
It works simply by running the 'pwgen' binary:
It also comes with some useful options such as: -y which adds a random character to each password -N which allows you to specify the number of passwords generated (by default the entire terminal is filled up with passwords) -H which allows you to generate repeatable passwords by using a file and a piece of text to seed the random number generator You can install pwgen on Debian/Ubuntu using:
For a full list of options have a look at 'man pwgen'.
It works simply by running the 'pwgen' binary:
$ pwgen
Teboo0sh Rahz3Jee aeWae1mn isheL9oo Ahbubo6o fie7ow7L eij3Re0i ieCheh2A
oSae0pah uGu1Co0k Pa0PhieZ riope6Ie IeC6aiYi zie4Yahx Yoh0quae yab2iCae
Ooqu2wei chel2ohG EeSh5jok hoxoZa7o He8gaale gao6EiSh Uo8loh1b Phie2gie
Ehei7ais yeicoo4Z Een1ohcu duZ9ook6 aQuu3wei YuW4gaen soh8ueCh Phohwai5
bi9bu4Li ieWah7ae Aip5Ohv0 lieM1aiG raeF6voe Fooduo9a pohqu3Da Ahn0iRio
Uwaech6U ne8Quu9b AhV3oNee zieG1thi Shai1Chu Zae0pie1 aet1geFe Ko8wi4go
It also comes with some useful options such as: -y which adds a random character to each password -N which allows you to specify the number of passwords generated (by default the entire terminal is filled up with passwords) -H which allows you to generate repeatable passwords by using a file and a piece of text to seed the random number generator You can install pwgen on Debian/Ubuntu using:
apt-get install pwgen
For a full list of options have a look at 'man pwgen'.
Thursday, 29 December 2011
Etckeeper on Ubuntu
There's a package in the Ubuntu repositories called 'etckeeper', which is a brilliant little tool for tracking changes to your configuration stored under the /etc directory.
The way it works is that it puts the whole of the /etc directory under version control, using one of either Bazaar, Mercurial, Git or Darcs. Then, whenever changes are made, either directly by modifying a file, or indirectly by running something like "apt-get update" it makes a note of who made the changes and what the differences in the files were. It then becomes easy to roll back configuration changes, find out who made the change and what the specific change to the configuration file was.
There's a good writeup on the basic usage on the Ubuntu Server Guide page.
Installing 'etckeeper' is as easy as:
It will use Bazaar as the VCS by default and will commit the first revision on installation.
Then, let's say that we wanted to install Apache, we would do this using "apt-get" as per usual, but during the install there'd be an extra section dealing with the commit by etckeeper:
So, we can see that as well as installing Apache, apt-get has committed the changes to the /etc/ directory as well. If you want to see what those changes are, you can using the "bzr log" command as below:
So from the above output we can see who made the last change to this file, we can see that it was made as a part of an "apt" run and we can see the list of other packages that were installed as a part of this run.
When you make a change to any files under /etc directly, the changes aren't committed straight away, but are rather committed daily (probably by a cron job). To see whether there are any files which have been modified but not committed, use the "bzr status" command:
And to commit the change manually, use the "etckeeper commit" command:
Hopefully this has been a good introduction to etckeeper and it's use. While it won't stop people breaking things due to bad configuration, at least it can be helpful for preserving a working config and quickly determining what changes were made, by who and for what reason.
The way it works is that it puts the whole of the /etc directory under version control, using one of either Bazaar, Mercurial, Git or Darcs. Then, whenever changes are made, either directly by modifying a file, or indirectly by running something like "apt-get update" it makes a note of who made the changes and what the differences in the files were. It then becomes easy to roll back configuration changes, find out who made the change and what the specific change to the configuration file was.
There's a good writeup on the basic usage on the Ubuntu Server Guide page.
Installing 'etckeeper' is as easy as:
sudo apt-get install etckeeperIt will use Bazaar as the VCS by default and will commit the first revision on installation.
Then, let's say that we wanted to install Apache, we would do this using "apt-get" as per usual, but during the install there'd be an extra section dealing with the commit by etckeeper:
$ sudo apt-get install apache2
[sudo] password for srdan:
Reading package lists... Done
Building dependency tree
Reading state information... Done
The following extra packages will be installed:
  apache2-mpm-worker apache2-utils apache2.2-bin apache2.2-common libapr1 libaprutil1 libaprutil1-dbd-sqlite3 libaprutil1-ldap libcap2
Suggested packages:
  apache2-doc apache2-suexec apache2-suexec-custom
The following NEW packages will be installed:
  apache2 apache2-mpm-worker apache2-utils apache2.2-bin apache2.2-common libapr1 libaprutil1 libaprutil1-dbd-sqlite3 libaprutil1-ldap libcap2
0 upgraded, 10 newly installed, 0 to remove and 3 not upgraded.
Need to get 3,248 kB of archives.
After this operation, 11.7 MB of additional disk space will be used.
Do you want to continue [Y/n]? Y
Get:1 http://archive.ubuntu.com/ubuntu/ oneiric/main libcap2 amd64 1:2.21-2 [12.2 kB]
Get:2 http://archive.ubuntu.com/ubuntu/ oneiric/main libapr1 amd64 1.4.5-1 [88.8 kB]
...
...
...
ldconfig deferred processing now taking place
Committing to: /etc/
modified .etckeeper
added apache2
added apache2/apache2.conf
added apache2/conf.d
added apache2/envvars
added apache2/httpd.conf
added apache2/magic
added apache2/mods-available
added apache2/mods-enabled
added apache2/ports.conf
...
added rc6.d/K09apache2
added ufw/applications.d/apache2.2-common
Committed revision 6.
So, we can see that as well as installing Apache, apt-get has committed the changes to the /etc/ directory as well. If you want to see what those changes are, you can using the "bzr log" command as below:
$ sudo bzr log /etc/apache2/httpd.conf
------------------------------------------------------------
revno: 6
committer: srdan
branch nick: etckeeper1 /etc repository
timestamp: Thu 2011-12-29 12:05:11 +1300
message:
  committing changes in /etc after apt run

  Package changes:
  +apache2 2.2.20-1ubuntu1.1
  +apache2-mpm-worker 2.2.20-1ubuntu1.1
  +apache2-utils 2.2.20-1ubuntu1.1
  +apache2.2-bin 2.2.20-1ubuntu1.1
  +apache2.2-common 2.2.20-1ubuntu1.1
  +libapr1 1.4.5-1
  +libaprutil1 1.3.12+dfsg-2
  +libaprutil1-dbd-sqlite3 1.3.12+dfsg-2
  +libaprutil1-ldap 1.3.12+dfsg-2
  +libcap2 1:2.21-2
So from the above output we can see who made the last change to this file, we can see that it was made as a part of an "apt" run and we can see the list of other packages that were installed as a part of this run.
When you make a change to any files under /etc directly, the changes aren't committed straight away, but are rather committed daily (probably by a cron job). To see whether there are any files which have been modified but not committed, use the "bzr status" command:
$ sudo bzr status /etc
modified:
  apache2/sites-available/default
And to commit the change manually, use the "etckeeper commit" command:
$ sudo etckeeper commit "Changed the email address of the default webmaster"
Committing to: /etc/
modified apache2/sites-available/default
Committed revision 7.
Hopefully this has been a good introduction to etckeeper and it's use. While it won't stop people breaking things due to bad configuration, at least it can be helpful for preserving a working config and quickly determining what changes were made, by who and for what reason.
Sunday, 18 December 2011
belongsTo Relationships in Grails and DB schema
There are three (two actually as far as DB schemas are concerned) types of belongsTo relationships in Grails:


The first one "belongsTo = [customer: Customer" defines a one-to-one relationship between CustomerOrders and Customers. It stores the reference in the "CUSTOMER_ORDER" table in a "CUSTOMER_ID" column:
The second and third types of belongsTo relationships produce the same type of schema, with neither the "CUSTOMER" or "CUSTOMER_ORDER" tables containing references to each other, but rather that relationship information being kept in a "CUSTOMER_CUSTOMER_ORDER" table.
How to view HSQLDB grails contents
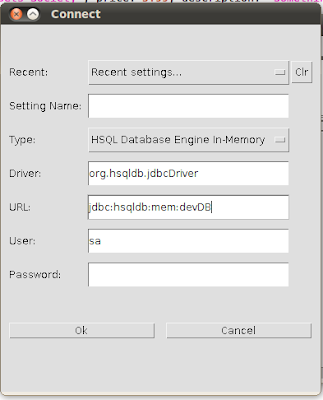
If you're working with Grails it's sometimes very useful to be able to view the layout and contents of the database that you're working with. If you're using the default HSQLDB engine that comes with Grails, one of the ways to achieve this is to launch the "Database Manager" application from your BootStrap file, giving you a GUI which you can use to explore the database.
This will result in the Database Manager GUI being launched:
class BootStrap {
def init = { servletContext ->
org.hsqldb.util.DatabaseManager.main()
}
def destroy = {
}
}
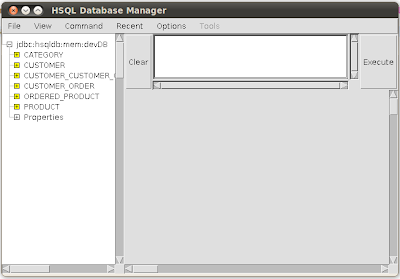
You just need to change the last part of the URL to "devDB" (or whatever you've chosen to name your development database) and hit the "Ok" button. You should be presented with the Database Manager's default screen, showing all of the tables in a list on the left.
Selecting the + next to each table allows you to see the columns/fields of each table and so forth. Entering SQL commands in the text portion and hitting the 'Execute' button, while using the application will allow you to see the contents of your database in real-time.
Note that closing the Database Manager window will close the application.
Additionally the Database Manager program is available from the "universe" debian and ubuntu repositories under the package name "hsqldb-utils". However I was unable to connect to the in-memory HSQLDB instance from a Database Manager instance launched outside of Grails. I'm assuming this is because it's launched as a seperate process, it gets its own memory space. It should be possible to get it to connect to the HSQLDB instance when using a file based database.
NOTE: The above instructions apply to pre 2.0 Grails versions. Since Grails 2.0, the way to see the Database schema has been to access the web interface, which is launched automatically at: http://localhost:8080/[ApplicationName]/dbconsole. You might need to change the URL, but shouldn't have to enter a password.
NOTE: The above instructions apply to pre 2.0 Grails versions. Since Grails 2.0, the way to see the Database schema has been to access the web interface, which is launched automatically at: http://localhost:8080/[ApplicationName]/dbconsole. You might need to change the URL, but shouldn't have to enter a password.
Subscribe to:
Posts (Atom)